
 Chinese
Let me be real with you—LED light strips are the easiest way to spruce up your home without even trying. Like, seriously, they’re that one hack that works for every single room. Got a boring accent wall in your living room that’s just… flat? Slap some LED strips on it, and boom—problem solved. Tired of your ceiling light being so harsh it feels like you’re in a doctor’s office? These things give off a soft glow that’s way cozier, I promise. And don’t even get me started on under kitchen cabinets—I used to squint so bad when chopping veggies, I was low-key scared I’d cut my finger someday. But these strips fixed that entirely. The best part? They look good and actually work—no useless “just for decor” junk that sits there collecting dust. If you’re here looking for how to install LED light strips at home, or want affordable quality recommendations for accent walls, ceilings, or kitchen cabinets, you’re in the right spot.
And full transparency, this ain’t gonna be some fancy guide with words you gotta Google to understand. I’m just gonna tell you how I used these in my own apartment, what I wish I knew before I started, and the dumb mistakes I made (spoiler: I once cut a strip in the wrong place and was so mad at myself for wasting money). We’re sticking to the three spots everyone uses for: living room accent walls, ceilings, and kitchen cabinets. Plus, I’ll tell you which ones I bought—they’re cheap, not garbage—so you don’t gotta drop a ton of cash to make your place look put-together. I’ll even break down what to look for when buying, like SMD5050 vs SMD2835 chips, voltage options, and waterproof grades, so you can pick the best DIY LED strip for your space.
I. Let’s Talk LED Light Strips (No Tech Talk, I Swear)
1.1 Why You’re Gonna Obsess Over LED Strips for Your Home
They’re flexible as heck
The best thing about these strips? They’ll stick to pretty much any surface you can think of. Curved walls? No biggie. Those tiny ceiling corners that feel impossible to reach? Super easy. Under your cabinets? Done in, like, two seconds. You don’t need to hire a pro or do any fancy custom work—just peel off the backing, stick down, and you’re done. And they look good with whatever decor you have, too. Minimalist? Yeah, works. A little fancy? Sure. Nordic? Absolutely. Even that modern Chinese style my friend is obsessed with? Fits like a glove. No more ugly, bulky light fixtures ruining your vibe.
They save energy (and cash!) and last forever
Let’s keep it real—nobody wants a lighting bill that makes you go, “Wait, how much?!” LED strips use barely any power (only 5-10 watts per meter), which is way better than those old fluorescent lights we all grew up with (70% more efficient, if you care about the numbers—but honestly, you don’t have to). And get this—they last up to 50,000 hours. That means you won’t be climbing a ladder to replace every few months (thank god, ladders low-key terrify me). Just stick up and forget about —your wallet will thank you later, trust me.
They’re perfect for mood and actual use
These ain’t just for show (though they’re really good at that). They come in different “color temperatures”—fancy way of saying warm or cool light. Warm light (3000K-4000K) is perfect for nights when you wanna cozy up, watch a movie, or read a book. Cool light (6000K-8000K) is better for when you need to focus—like chopping veggies or pretending to work at your desk. If you’re feeling goofy, get the RGB ones that change color—they’re great for movie nights or when you just wanna switch things up. But the best part? They’re bright enough to actually use. No more lights that look pretty but don’t help you see—these do both, and they do well.
Even DIY newbies can install them
I’ll be the first to admit—I’m not handy at all. I can barely hang a picture frame without it being crooked. But I installed my LED strips in 30 minutes, no lie. Most of have a peel-and-stick backing, so you don’t need any tools or wiring skills. Just grab a pair of scissors (and maybe a screwdriver if you’re feeling extra fancy) and go. They work whether you’re moving into a new place or just sprucing up your current one—no big renovation required. If I can do it, anyone can. Seriously.
1.2 What to Look for When Buying LED Strips (Don’t Overcomplicate It)
Voltage: 12V vs. 220V
For home use, you got two options: 220V (plugs straight into the wall, no extra parts) and 12V (low voltage, safer). If you’re putting ’em somewhere people might touch—like a kid’s room, or under cabinets where you might brush against go with 12V. It’s way safer, and you won’t have to worry about electric shocks. It’s a small thing, but it’s worth it for peace of mind.
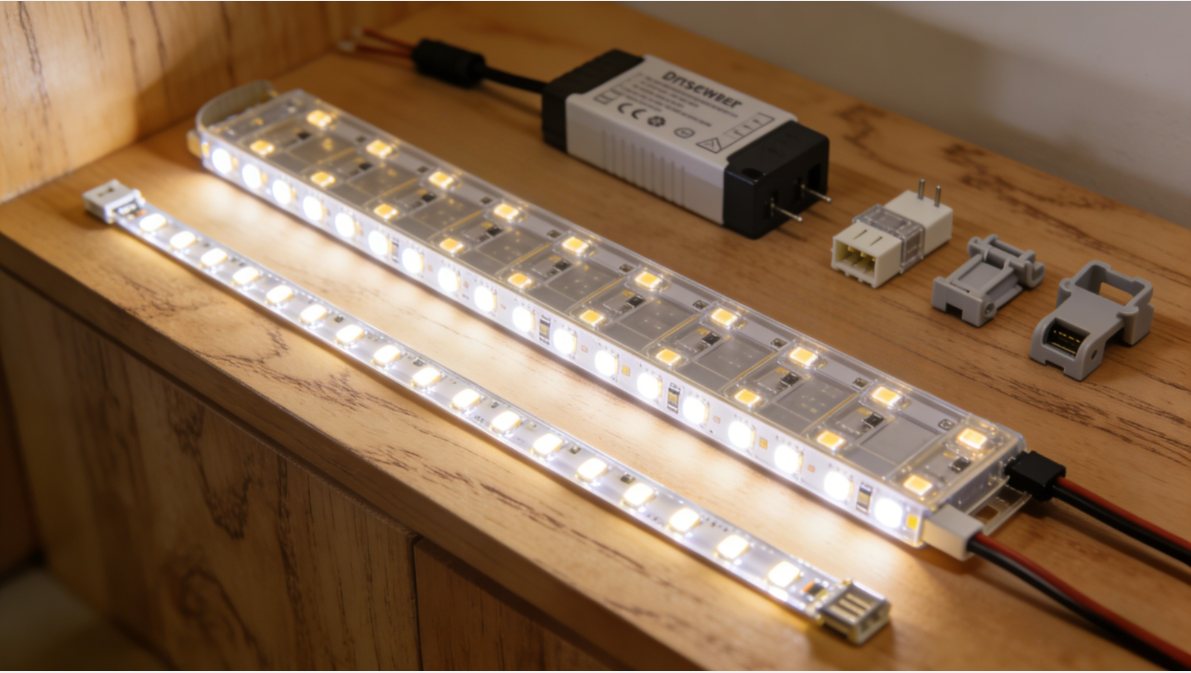
Chips and Brightness: Keep It Simple
You’ll see terms like SMD5050 and SMD2835 when you shop—don’t stress about it, I promise. They’re just the types of chips, and they’re the good ones (smooth light, no weird dark spots). SMD5050 is great for soft ambient light (ceilings, accent walls). As for brightness: 300-500 lumens per meter is perfect for walls and ceilings (gentle, not blinding). For under cabinets (where you need to actually see what you’re doing), go a little brighter—500-800 lumens. That’s it. Don’t overthink the numbers.
Waterproof Grade: Match It to the Space
IP44 vs. IP65—again, don’t overcomplicate this. For dry spots (living room walls, ceilings, closets), IP44 is totally fine. For places with moisture—like the kitchen near the sink, or the bathroom—go with IP65 or higher. All that means is they won’t get ruined by water or steam. Trust me, I skipped this once and had to replace my kitchen strips halfway through the year. Total waste of money, not worth it.
Color Temperature and Controls: Pick What Works for You
It’s simple, y’all: warm light = cozy (living room, bedroom). Cool light = focused (kitchen, home office). RGB = fun (anywhere you wanna add a little personality). Most of ’em come with a remote, or you can control ’em with your phone—super convenient. No need to get up from the couch to change the color? Total win, if you ask me.
| Selection Points | How to Choose |
| Voltage | Go for 220V plug-and-play (no extra transformer needed—super convenient) or 12V low-voltage (safer, great for kids’ rooms or cabinets) |
| Chips & Brightness | Pick SMD5050 or SMD2835 chips—they light up evenly with no dark spots. SMD5050 is especially good for light strips. Choose brightness based on the scene: 300-500 lumens for accent walls/ceilings (not glaring), 500-800 lumens for cabinets (bright enough to see clearly) |
| Waterproof Rating | For dry areas (living room accent walls, ceilings, cabinet interiors): IP44. For areas near water (under kitchen sinks): IP65 or higher |
| Color Temperature & Control | Living rooms/bedrooms: Warm light (3000K-4000K) – cozy. Studies/kitchens: Cool light (6000K-8000K) – easier to see. Want something unique? RGB color-changing strips—control with a remote or phone app, switch colors/brightness with one click |
1.3 Pre-Installation Checklist (Don’t Skip This!)
I skipped a few of these steps the first time, and it was such a hassle. Save yourself the headache and do these first, okay?
- Grab your tools: Scissors, screwdriver, wire stripper (if you need it), alcohol wipes (so important—dust and oil make the adhesive peel off!), and some extras: mounting clips, cable ties, transformer (if you’re using 12V), connectors, heat-shrink tubing.
- Measure first: Figure out where you’re putting ’em and how long you need. Measure the wall, ceiling, or cabinets—nothing worse than running out of strip halfway, or having extra that’s wasted. I measured twice, cut once, and still messed up a little—but you’ll probably do better than me.

- Safety first: Turn off the main power before you start. Working with live circuits is scary and dangerous—don’t be lazy. Check the wiring where you’re installing; if it’s old or damaged, fix it (or call a pro). And buy from a good brand! Cheap, no-name strips are a fire risk—don’t save a few bucks to risk that.
II. Real-Life Installation Examples (How I Did It)
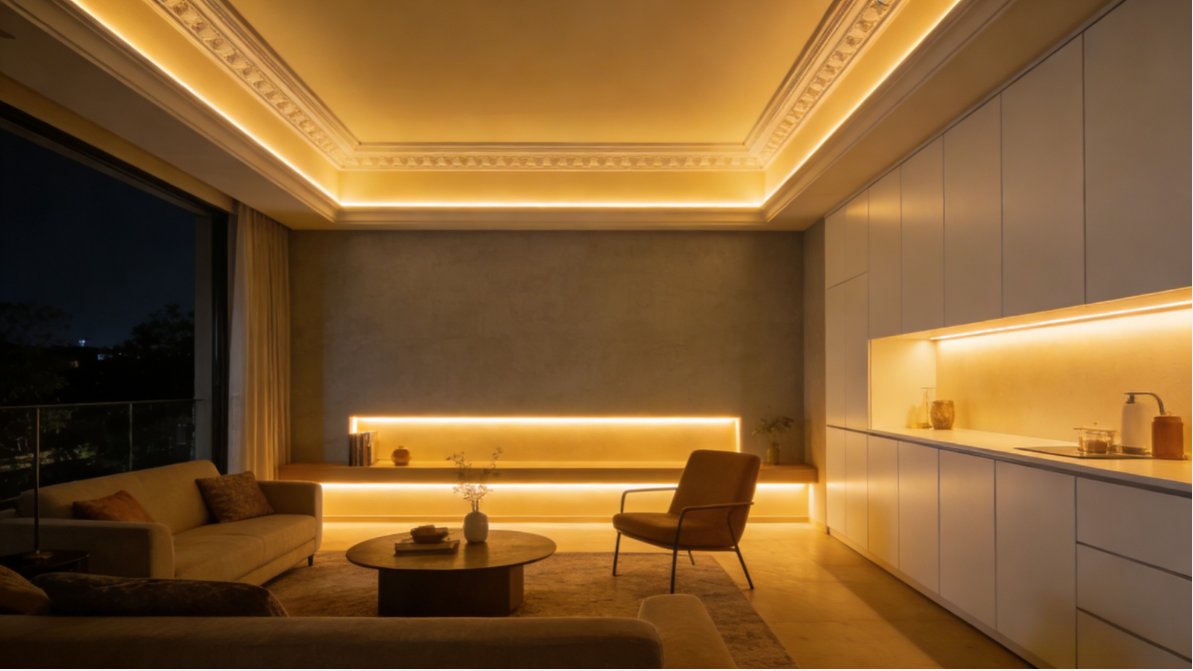
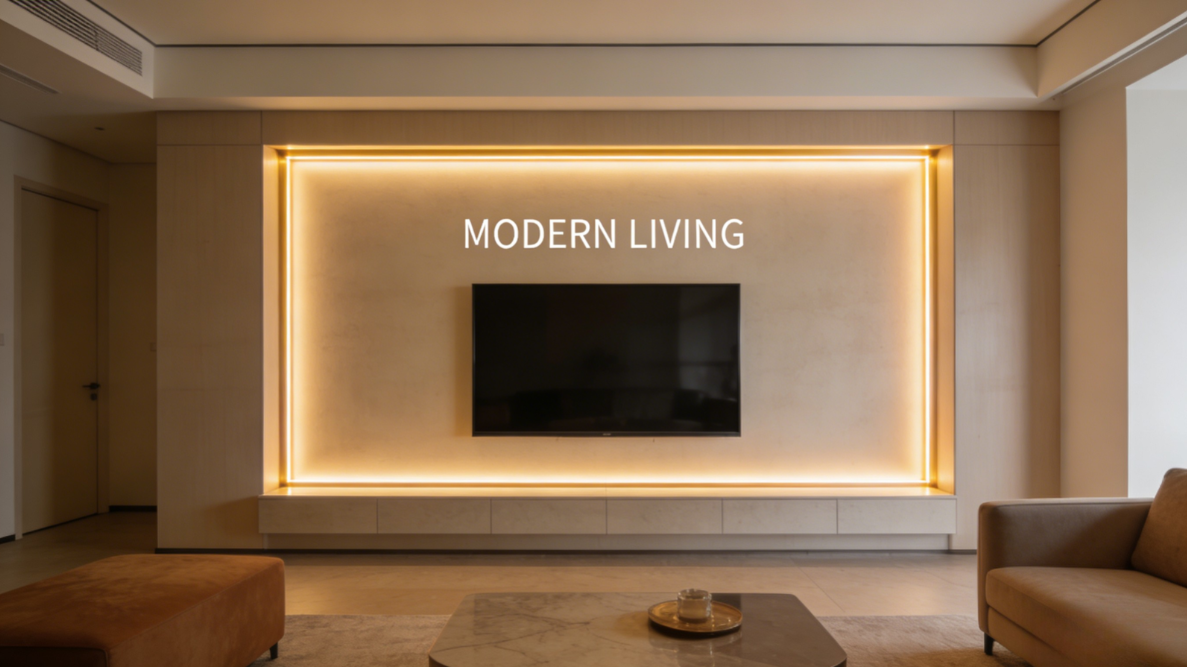
2.1 Case Study #1: Living Room Accent Wall (My Favorite Upgrade!)
My Setup
- Space: 25-square-meter living room in my two-bedroom apartment (small, but cozy—works for me)
- Vibe: Modern, minimalist (I hate clutter with a passion—my OCD is very happy)
- Accent Wall: Plain plasterboard with a little suspended section in the middle and a frame around the edges (super simple, but boring as heck before the strips)
- LED Strip: 8-meter 12V SMD5050 warm light (3500K), IP44, with a remote (so easy to use, even my mom could figure it out—and she’s not great with tech)
The Result
Total game-changer, guys. The frame hides the strip, and the light shines inward—so soft and cozy, it feels like a warm blanket. The suspended section is backlit too, which makes the wall not feel so flat and boring. It’s perfect for movie nights or just chilling with a book and a cup of tea. Every time someone comes over, they ask about it—I won’t lie, it’s a little flex, but I earned it.
Step-by-Step (Super Easy, I Promise)
1. Clean the surface: Wipe the inner frame and bottom of the suspended section with an alcohol wipe. Dust and oil make the adhesive peel off—I learned this the hard way (my first strip fell off after a week, and I was so annoyed). Make sure it’s spotless, okay?
2. Cut the strip: Measure the path, then cut ONLY at the little scissor icons (you’ll see ’em every few LEDs). Cut anywhere else, and that part won’t light up. I did this once and wasted a chunk of strip—learn from my dumb mistake.
3. Stick it on: Peel off the protective film, line up the strip, and press firmly the whole way. No kinks or bends—gentle curves around corners (sharp folds break the circuit). Use the little mounting clips at the ends and corners to keep it from sagging; adhesive alone gets weak over time, trust me.
4. Hide the wires: Run the power wire to an outlet—tuck it into a groove or through the ceiling if you can. I connected mine to a wall-controlled socket so I don’t have to plug/unplug it every time (lazy, but totally worth it). Bundle extra wire with cable ties and tuck it away—messy wires ruin the whole look, and my OCD can’t handle that.
5. Test it out: Turn the power on and make sure it works—no flickering, no dim spots. If it’s good, you’re done! If you want an even softer glow, add a diffuser cover.
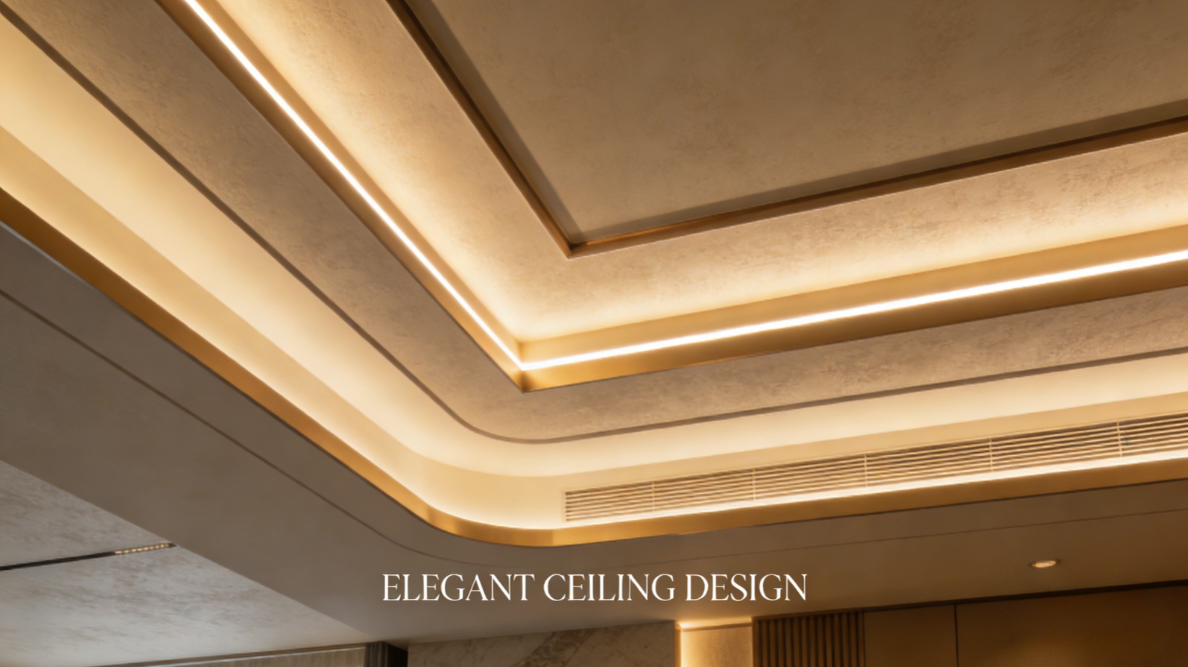
2.2 Case Study #2: Ceiling Installation—Mistakes I Made (Don’t Do This!)
Ceiling LED strips are amazing—they make the room feel bigger and cozier. But I messed up a few things the first time I installed ’em. Here’s what to avoid so you don’t look like a rookie (like I did):
①- Get a cove/groove: If you’re renovating, tell your contractor to add a little recess for the strip. I skipped this, and my strips looked so messy (sticking straight to the ceiling is not sleek at all). Plan ahead—it’s worth it for the clean look.
②- No flickering strips: Ceiling lights are your main ambient light—don’t buy cheap ones that flicker. It’s hard on your eyes and so annoying (felt like I was in a horror movie, fr). Spend a little extra on flicker-free—your eyes will thank you later.
③- Keep the transformer cool: If you’re using 12V, the transformer (the little box that converts power) needs air to breathe. Don’t tuck it into an airtight spot—mine overheated once and stopped working (total panic moment). Put it somewhere accessible and ventilated.
2.3 Case Study #3: Kitchen Cabinets (Game-Changer for Cooking!)
My Setup
- Space: Tiny 8-square-meter kitchen in my apartment (small, but it works… most of the time)
- Vibe: Simple, Nordic (clean lines, light colors, lots of wood—super calm)
- Problem: Upper cabinets cast a dark spot on the counter—I could barely see while chopping veggies, and I almost cut my finger once (scared me half to death). Lower cabinets were dark too, so I’d fumble for bowls like an idiot.
- LED Strip: 6-meter 12V SMD5050 cool light (6500K), IP65 (waterproof!), with a motion sensor (hands-free = perfect for messy cooking days, let me tell you).
The Result
I can’t believe I lived without this at all. The strip under the upper cabinets lights up the counter perfectly—no more shadows, no more near-mishaps. The one inside the lower cabinets lets me find bowls in seconds (no more digging around in the dark like a fool). And the motion sensor? Pure genius. When my hands are covered in flour or oil, I just wave, and the lights turn on. Best $20 I ever spent—total kitchen upgrade without any renovation.
Step-by-Step (Kitchen-Specific Tips)
① Measure and pick the right strip: Measure the bottom of upper cabinets and inside lower ones. Kitchens are humid and greasy—get IP65 or higher (waterproof!). Motion sensor is a must—you don’t wanna touch a switch with greasy hands, trust me.
②Clean (extra well!): Wipe cabinets with alcohol wipes—kitchen grease is sneaky, and it ruins the adhesive. I missed a spot once and had to clean it again because the strip started peeling. Don’t be like me.
③Stick and secure: For upper cabinets, stick the strip near the front edge, facing down (angle it so it doesn’t shine in your eyes—no one wants a bright light in their face while cooking). For lower cabinets, stick it inside the front frame. Use mounting clips—grease weakens adhesive over time, so clips keep it in place.
④Waterproof the connections: Run wires along cabinet insides (tuck behind hinges so they’re out of sight). At every connection, use waterproof glue or connectors—moisture and grease = short circuits. Don’t skip this! I did once, and the strip stopped working after a month. Total bummer.
⑤Test it: Turn power on, test the sensor (waving your hand never gets old, tbh), and check for even light. Make sure all connections are sealed tight—you don’t want water or grease ruining your strip.
2.4 Kitchen Cabinet Reminders (Don’t Forget These!)
- Waterproof is non-negotiable. Kitchens are harsh—moisture, steam, grease. IP65+ or don’t bother. Don’t cheap out here, it’s not worth it.
- Hands-free switch is a game-changer. Motion or touch-activated—no touching with messy hands. It’s a small detail, but it makes cooking way easier.
- No glare! Angle the strip so it lights the counter, not your eyes. Front edge, facing down = perfect. You wanna see what you’re chopping, not be blinded by the light.
III. General Tips for Any LED Strip Project (My Pro Hacks)
3.1 Safety First (Duh, But Important)
- Turn off main power before wiring. Live circuits are dangerous—don’t be lazy. I’ve heard horror stories, and I don’t want you to be one of ’em.
- Buy reputable brands. Cheap strips = fire risk. Spend a little extra—it’s worth it for safety. I bought a cheap one once, and it started flickering after a week (scared me half to death).
- 12V is safer for high-traffic areas (kid’s rooms, kitchens). And keep strips away from curtains or fabric—no fire risks! You don’t wanna burn down your house over a $20 light strip.
3.2 Installation Hacks (From a DIY Newbie)
- Cut only at the scissor icons. Clean the edge after cutting—no damaged circuits. I learned this the hard way (wasted strip = sad me).
- Press firmly after sticking. Hold it down for a minute or two—adhesive sticks better. Don’t just peel and stick and walk away; press it down good.
- Hide wires! Messy wires ruin the look. Tuck ’em away, bundle extra with cable ties. A clean install looks way better than a messy one, trust me.
3.3 Maintenance (Super Easy)
- Wipe strips with a dry cloth every now and then—dust dims the light. Kitchen strips need extra wiping (grease!). I wipe mine once a week, and they still look new.
- Check every few months. Look for peeling strips or frayed wires—fix ’em right away. Small issues turn into big ones if you ignore ’em.
- Don’t leave ’em on 24/7. Turn ’em off when you’re not using ’em—extends their life. And don’t flip colors/brightness nonstop; it strains the controller. I used to do this for fun, and mine died after 6 months. Oops.
IV. My Favorite LED Strips (Affordable & Good Quality)
| Suitable Scenarios | Recommended Model |
| Living room accent walls & ceilings | SMD5050/SMD2835 chip; 12V low-voltage or 220V plug-and-play; 3000K-8000K multi-color temperature; IP44 waterproof; non-flickering; remote/app control |
| Cabinets | SMD5050 chip; 12V low-voltage; 6500K cool light/3500K warm light; IP65+ waterproof; motion/touch control |
| Whole-house universal (accent walls, hallways, balconies, etc.) | SMD5050 chip; 12V low-voltage; RGB color-changing; IP44 waterproof; remote/app control (customizable colors, brightness, modes) |
4.1 For Living Room Accent Walls & Ceilings
Look for: SMD5050/2835, 12V/220V, 3000K-8000K (multiple colors), IP44, flicker-free, remote/app control.
Why I love: Flexible, easy to fit into coves/walls, soft even light, lasts forever. Blends with any decor—no fancy setup. I have these in my living room, and they’re still going strong after a year.
4.2 For Cabinets & Task Lighting
Look for: SMD5050, 12V, 6500K (cool) or 3500K (warm), IP65+, sensor/touch control.
Why I love: Handles kitchen grease/moisture like a pro, hands-free control, bright enough for cooking. Total lifesaver. I can’t imagine cooking without mine now.
4.3 Best All-Around Strip (My Go-To)
Look for: SMD5050, 12V, RGB color control, IP44, remote/app control.
Why I love: Works everywhere—walls, ceilings, cabinets, even balconies. Change mood with a click, energy-efficient, affordable. Perfect for versatility. I have these in my bedroom, and I switch the color based on my mood (pink when I’m happy, blue when I’m chill).
V. Final Thoughts: LED Strips = Home Upgrade Win
If you’re looking for an easy, affordable way to make your home feel cozier, sleeker, or more fun—LED light strips are it. You don’t need DIY skills, you don’t need to spend a ton, and they make a huge difference. Whether you’re sprucing up an accent wall, adding ambient ceiling light, or fixing dark kitchen cabinets—they work for whatever you need. This guide covers everything you need for home LED light strip installation, from what to buy to step-by-step tips, so you can upgrade your space without stress.
Contact us if you want to know more installation method of LED light strips!
Post time: Jan-30-2026