
 Chinese
The DMX light strips, with their precise color control and synchronized effect,are widely used in commercial lighting, stage performances, hotel atmosphere creation, smart home settings, etc., and have become the core product in the field of LED intelligent lighting. However, during actual installation and use,many users encounter problems with the DMX light strips not being controllable – such as flickering, color disorder, no response, and out-of-control in certain areas. This not only affects the user experience but may also delay project acceptance and event organization.
As a professional manufacturer of LED light strips, we, based on over 20 years of industry experience, have compiled a set of clear and practical troubleshooting and solution guidelines.
Before troubleshooting the issue, we first clarify the specific manifestations of the DMX light strip not being controlled. This is to avoid misjudging the problem and taking unnecessary detours. The reason why the DMX light strip is not controlled is essentially due to abnormal signal transmission, equipment matching, or parameter settings of the DMX512 control protocol. As a result, the instructions sent by the controller cannot be accurately transmitted to the light strip, or the light strip cannot correctly interpret the instructions.
1.Common Uncontrolled Behaviors
●Completely unresponsive: The controller is operating normally, but all the DMX light strips are not lit, do not change colors, and there is no any movement.
●Flashing disorder: The light strips flicker frequently, with inconsistent brightness and color, or the colors randomly jump, which does not match the preset effect of the controller.
●Partial malfunction: In the entire light strip, some sections are functioning normally while others do not respond, have color distortions, or are not synchronized with each other.
●Response delay: After operating the controller, the light strips need to wait for several seconds or even tens of seconds before executing the command, and the effect becomes choppy.
●False triggering: When the controller is not being operated, the light strip automatically changes colors and flashes, resulting in the “uncontrolled autonomy” phenomenon.
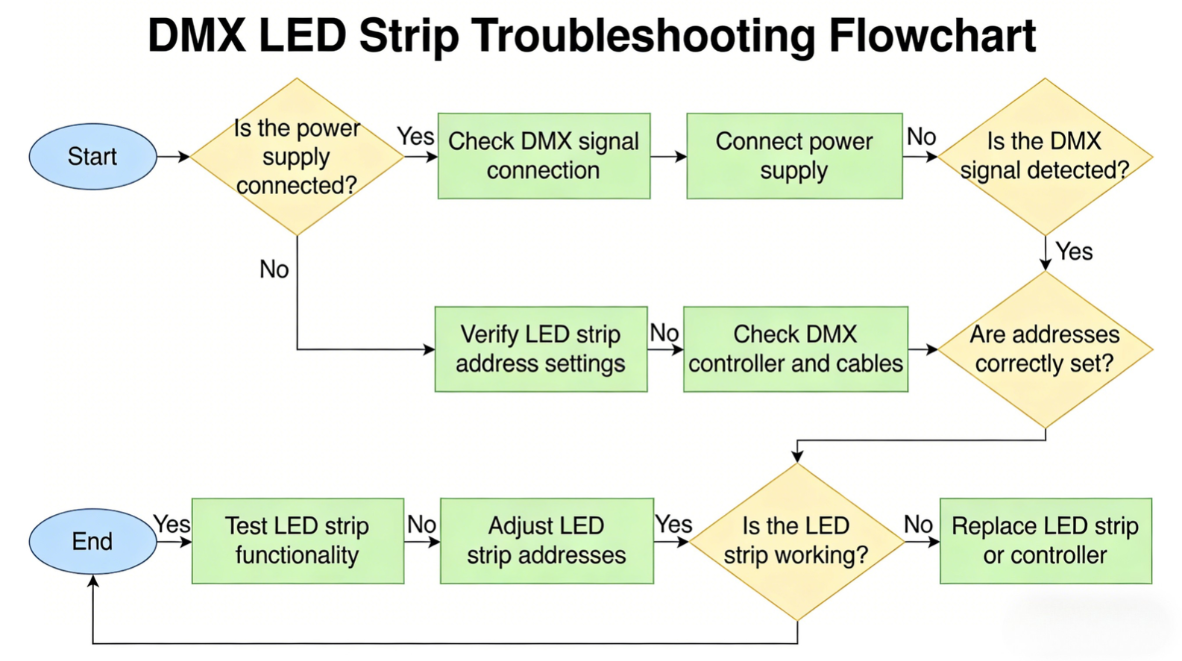
I. Core Investigation: Proceeding from “simple to complex”, 4 steps to identify the root cause of the fault
Step 1: Check the power system
Power supply is the foundation for the normal operation of DMX light strips. Most uncontrolled issues are related to abnormal power supply. Prioritizing this step can quickly resolve 80% of basic faults.
●Check the compatibility of power supply specifications: Ensure that the output voltage and current of the power supply match the rated voltage and total power of the DMX light strip.
●Check the power supply load: If the DMX light strip is too long or there are too many of them, it is necessary to confirm whether the power supply is overloaded.
●Inspect the power supply lines: Check the connection lines between the power source, the light strips and the controller. Look for any looseness, detachment or damage. Poor contact of the lines can cause unstable power supply, which in turn affects the signal transmission.
Step 2: Check the connection lines
The DMX light strip transmits signals using the DMX512 protocol. It relies on dedicated signal lines (shielded twisted pair cables) and correct connection methods. Incorrect wiring, poor contact, and interference can all result in signal loss, causing uncontrolled issues. This is the core part of troubleshooting.
●Check the connection method: The DMX light strips should be connected in a “daisy chain” (Daisy Chain) manner. Star connection, branch connection are prohibited. The transmission path should follow “controller → DMX decoder → light strips”, and reverse connection is not allowed.
●Check the terminal resistor: The last device (or light strip) in the DMX signal chain needs to be equipped with a 120Ω terminal resistor to prevent signal reflection interference. Failure to install a terminal resistor or installing multiple terminal resistors (dual terminals) will all cause signal disorder, resulting in flickering andout of control of the light strip.
●Check for line interference: Check if the signal lines are laid parallel or intertwined with strong wires (such as 220V power lines). Strong electrical interference can damage the DMX signal. It is recommended that the signal lines be kept at a distance of more than 30cm from the strong wires and be separately laid; at the same time, avoid placing the signal lines close to strong interference devices such as frequency converters and audio equipment.

Step 3: Check the controller and parameter settings
The controller is the “brain” of the DMX light strip, responsible for sending control instructions. Incorrect parameter settings or controller failure will directly result in the light strip being out of control. The key points for troubleshooting are to check the “settings” and the “device itself”.
●Check the status of the controller: Ensure that the controller has been powered on normally and that the indicator lights are showing normally.
●Check the address code settings: Each section of the DMX light strip has an independent starting address code, which must be consistent with the address setting of the controller.
●Check channel settings: Ensure that the channel settings of the controller match the channel requirements of the light strip.
●Check the Universe settings: For large systems that use multiple Universes, it is necessary to ensure that the Universes displayed on the console are consistent with those set for the lamps; otherwise, the lamps will not be able to receive signals.
●Check the controller load: Confirm the number of control channels of the controller and determine if it exceeds the maximum load.
Step 4: Check the light strip itself and the decoder
If all the above three steps are without any issues, it indicates that the fault might be in the DMX light strip itself or the decoder. The focus should be on checking whether the driver of the light strip, the light bulbs, and the decoder are functioning properly.
●Check the status of the decoder: The DMX decoder is responsible for converting digital signals into analog signals that the light strips can execute. Check if the decoder indicator lights are functioning properly. You can replace the decoder for testing and troubleshoot any decoder faults.
●Check the light strip driver: The DMX light strip has an internal driver module. If the driver is damaged, it will cause the light strip to fail to receive signals. You can cut a section of a normal DMX light strip and connect it to the faulty area’s circuit. If it is properly controlled, it indicates that the original light strip driver is damaged.
●Inspect the light bulbs of the light strip: If there is an abnormality in some areas of the light strip, it might be due to damaged local light bulbs or broken wiring. You can observe the surface of the light strip to check for any blackening or damage. Use a multimeter to test the conductivity of the light bulbs.
●Check the compatibility of the light strips: Ensure that the DMX light strips are compatible with the controller and decoder (both support the DMX512 protocol). Some non-standard DMX light strips may not be compatible with general controllers, resulting in no control.
Rather than troubleshooting after the equipment malfunctions, it is better to take preventive measures in advance. Based on the usage scenarios and failure patterns of the DMX light strips, the following three points should be done to significantly reduce uncontrolled issues, extend the lifespan of the light strips, and reduce maintenance costs.
①Select LED light strips, controllers and decoders that comply with the DMX512 standard. Ensure protocol compatibility and preferentially choose brand products (such as our DMX light strips, which are equipped with high-quality drivers, have strong anti-interference capabilities, and support long-term stable operation)
②Use DMX-specific shielded twisted-pair cables to avoid using ordinary wires. The connectors should be made of gold-plated material to enhance contact stability and anti-oxidation capability.
③The power supply should be a high-power and stable switching power supply. A 20% margin should be reserved for the load to avoid overloading.
④Connect strictly in a “daisy chain” manner. Star connection and branch connection are prohibited. At the end of each link, a 120Ω terminal resistor must be installed.
⑤Keep the signal lines at least 30 cm away from the high-voltage wires.
⑥When wiring, avoid damaging the signal lines or over-bending them. Ensure that the joints are firmly welded and take proper measures to prevent moisture.
⑦When conducting long-distance transmission (over 300 meters), it is advisable to properly install DMX repeaters and signal distributors to ensure signal integrity.
As a professional LED light strip manufacturer, we not only offer high-quality and highly stable DMX light strip products, but also provide comprehensive technical support, covering product selection, installation guidance, fault diagnosis, after-sales maintenance, and solving all your DMX light strip usage problems in one go. If you encounter complex and uncontrollable issues that you cannot solve on your own, you can contact our technical team for one-on-one precise guidance, ensuring the stable operation of your DMX light strips and achieving the best lighting effect.
Facebook:https://www.facebook.com/profile.php?id=100089993887545
Instagram:https://www.instagram.com/mx.lighting.factory/
YouTube:https://www.youtube.com/channel/UCMGxjM8gU0IOchPdYJ9Qt_w/featured
LinkedIn:https://www.linkedin.com/company/mingxue/
Post time: Mar-16-2026