
 Chinese
With the rapid advancement and widespread application of LED lighting technology, traditional outdated light strips—including fluorescent strips and low-quality LED strips—are increasingly prone to performance degradation issues such as luminance attenuation, light flicker, excessive power consumption, and frequent mechanical failures. These defects not only compromise the aesthetic and functional integrity of spatial lighting but also pose potential electrical safety hazards. Many users intend to carry out self-renovation and replacement of old light strips yet face bottlenecks in disassembly and wiring matching, with common concerns including equipment burnout due to incorrect wiring and functional failure post-renovation. This professional guide elaborates on the standardized procedures for old light strip renovation and replacement, with a core focus on scientific and accurate original wiring matching techniques. The content is structured for operability, enabling even non-professional operators to complete the renovation work safely and efficiently, while achieving energy-saving, high-brightness, and long-service-life lighting upgrade effects.
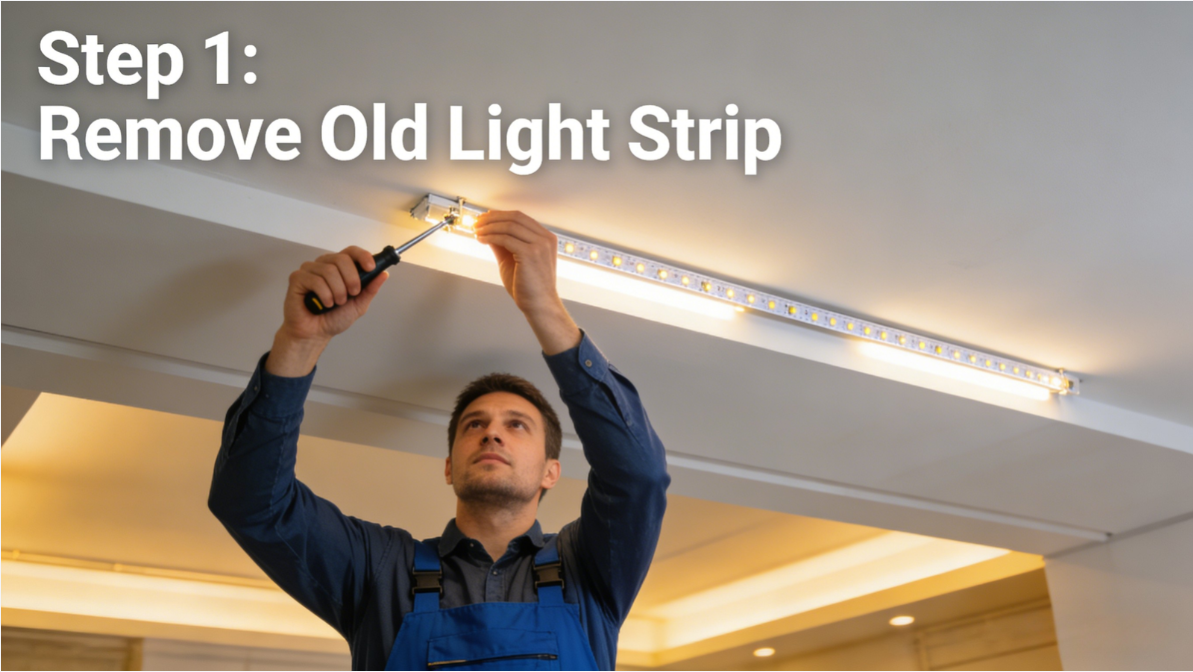
1. Standardized Dismantling of Old Light Strips (Protective Disassembly to Preserve Original Wiring Integrity)
1.1 Removal of Old Light Strip Fixing Assemblies
Execute disassembly in strict accordance with the original fixing method of the light strip to avoid damage to the base and wiring:
●For snap-fixed light strips: Use a standard screwdriver to gently pry open the fixing snaps at the designated positions and remove the old light strip in a parallel manner.
●For adhesive-backed light strips: Use a utility knife to make a gentle linear cut along the bonding edge of the light strip and the base; avoid brute force pulling to prevent wiring breakage and base surface damage.
●For slot-embedded light strips: Grip one end of the light strip and pull it out of the embedding slot at a constant slow speed along the slot direction.
1.2 Disconnection of Old Light Strip and Wiring Terminals
Locate the connection nodes between the old light strip, driving power supply and original wiring, and perform disconnection in accordance with the following specifications:
●For terminal-connected assemblies: Directly extract the wiring terminals from the connection ports in the specified direction without forced twisting.
●For wire-wound connections: Use a professional wire stripper to carefully peel off the insulating tape at the connection; mark the positive and negative poles of the wiring with a permanent marker before separation to eliminate subsequent wiring errors.
1.3 Cleaning of Installation Area and Finishing of Original Wiring
Complete the post-dismantling finishing work to lay the foundation for the installation of new light strips:
1-Conduct a thorough cleaning of the installation base, removing dust, residual adhesive, and other debris to ensure a smooth and clean bonding/installation surface.
2-Straighten and organize the original wiring, check for signs of aging, cracking, and oxidation; cut off damaged and invalid wiring sections, and retain the intact wiring with a reserved length of 5-10cm for convenient connection with new LED strips.
3-Secure the organized wiring to the base with cable ties to avoid random placement and subsequent interference.
1.4 Classification and Disposal of Old Light Strips and Accessory Components
Implement standardized classification and environmental protection disposal of waste components, and conduct functional inspection of reusable accessories:
●Classify and collect old light strips, damaged driving power supplies, and invalid connecting parts; hand over to qualified waste electrical and electronic product recycling institutions for professional disposal to comply with environmental protection regulations.
●Perform a comprehensive functional test on the original driving power supply, wiring terminals and other reusable accessories; mark and store intact accessories for standby use, and eliminate unqualified components to avoid hidden dangers in secondary use.
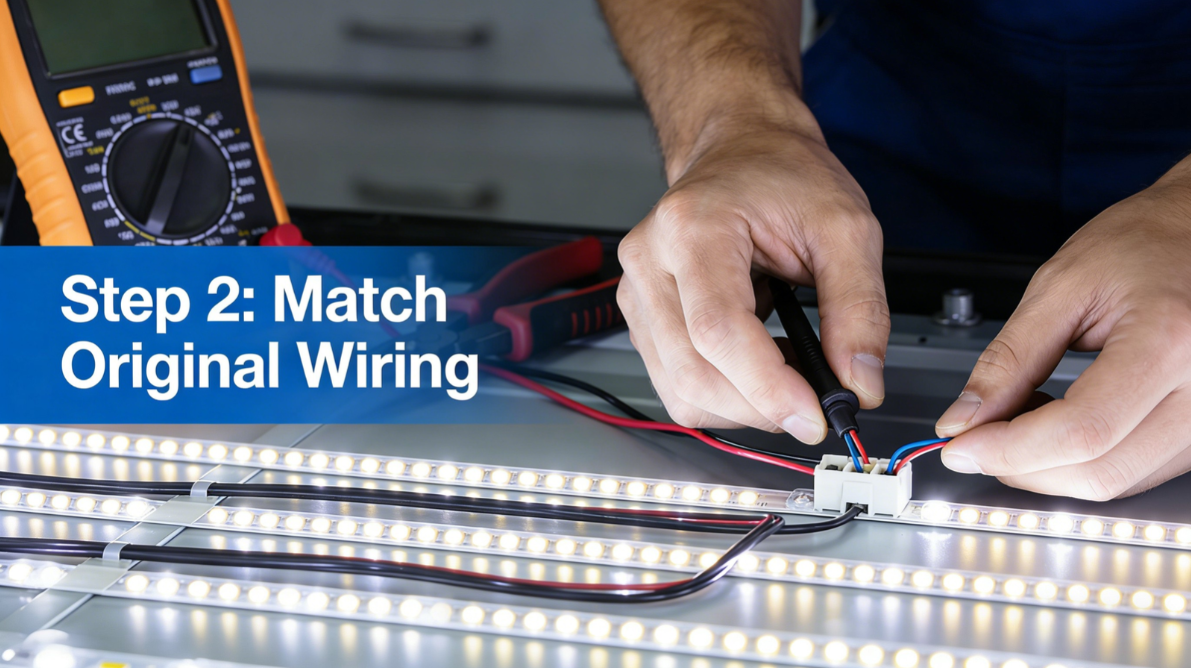
2. Core Technical Link: Scientific Matching of Original Wiring (Key to Renovation, Eliminating Wiring Errors)
2.1 Accurate Detection of Original Wiring Voltage Parameters
Voltage matching is the fundamental prerequisite for the normal operation of LED light strips. Use a digital multimeter to perform a precise voltage test on the output end of the original wiring, and record the measured values in detail. Common rated voltages for LED strips are 12V (mainly for household scenarios) and 24V (mainly for commercial and industrial scenarios). The rated voltage of the newly selected LED light strip must be completely consistent with the measured voltage of the original wiring; voltage mismatch will directly lead to instant burnout, failure to light up, or drastic reduction in the service life of the light strip.
2.2 Confirmation of Wiring Positive and Negative Polarity
LED light strips are unidirectional conductive components, and reverse connection of positive and negative poles will result in failure to light up without damaging the strip itself. The confirmation methods for LED strip wiring are as follows:
1.Check the polarity marks: The original wiring and old light strips are usually marked with “+” (positive pole) and “-” (negative pole); the positive pole of the wiring is generally the live wire, and the negative pole is the neutral wire, which can be auxiliary distinguished by wire color (red for positive pole, black/blue for negative pole in conventional wiring).
2.Multimeter detection: For unmarked wiring, use a multimeter to detect the polarity and mark it clearly to ensure one-to-one correspondence of positive and negative poles during subsequent original wiring matching.
2.3 Verification of Original Wiring Load Capacity
Calculate the load bearing capacity of the original wiring to avoid potential safety hazards such as wiring overheating and short circuit caused by overload operation in LED strip wiring installation:
1-Calculate the total rated power of the new LED light strip according to the formula: Total power = Power per meter × Actual installation length of the light strip.
2-Check the cross-sectional area and material of the original wiring, and confirm its maximum bearable power (load capacity) in accordance with electrical engineering specifications.
3-Ensure the total rated power of the new light strip is less than 80% of the original wiring’s load capacity; if the load is insufficient, replace the wiring with a larger cross-sectional area or adopt a shunt installation method for the light strip to distribute the load.
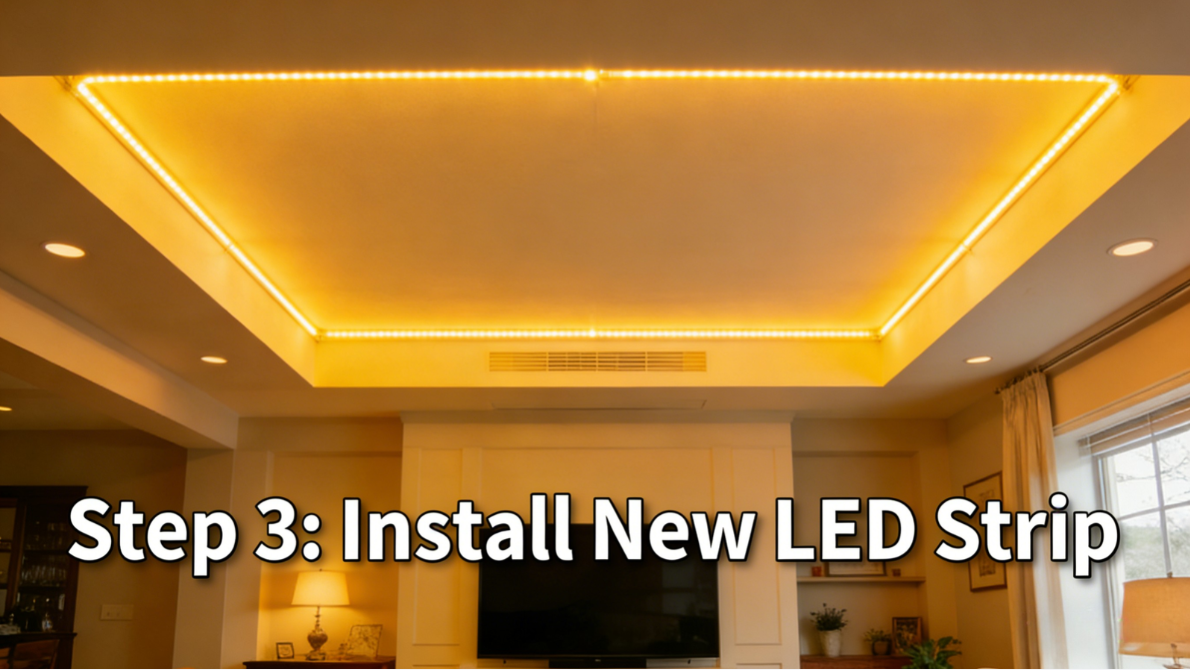
3. Standardized Installation of New LED Light Strips (Formal Installation to Ensure Long-Term Stable Operation)
3.1 Precision Cutting of New LED Light Strips
Cut the light strip strictly in accordance with the product specifications to avoid damage to the internal circuit in LED strip wiring installation:
●Locate the standard cutting marks on the light strip (usually set every 10cm/20cm according to the product model), and use sharp scissors to make a flat and vertical cut at the mark.
●Prohibit cutting at non-marked positions, as this will damage the internal series circuit of the LED light strip and cause local or overall failure to light up.
●Trim the burrs at the cutting port with a utility knife after cutting to prevent short circuit caused by metal burrs.
3.2 Reliable Fixation of New LED Light Strips
Select the appropriate fixing method according to the installation base and usage scenario to ensure the firmness and stability of the light strip, especially for waterproof LED strip installation:
●For smooth and flat bases: Tear off the protective film of the light strip’s self-adhesive backing, attach the light strip to the designated position, and press it evenly along the length of the light strip to ensure close bonding without air bubbles and looseness.
●For uneven bases or high-stability demand scenarios: Cooperate with dedicated fixing clips for auxiliary fixation, install one fixing clip every 30-50cm along the light strip, and lock the clips to the base to prevent the light strip from falling off due to vibration or temperature changes.
3.3 Professional Wiring Connection and Driving Power Supply Installation
Carry out LED strip wiring installation and power supply installation in accordance with electrical operation specifications to ensure electrical safety and functional stability for old LED light strip renovation:
1-Connect the new light strip to the original wiring (or new wiring) in strict accordance with the polarity marks confirmed in Chapter 2, and use professional wiring terminals for connection (avoid direct wire winding for long-term use scenarios).
2-Select a driving power supply matching the rated voltage and total power of the light strip; connect the input end of the power supply to the mains supply and the output end to the light strip wiring, and confirm the correctness of the connection again for 12V 24V LED strip wiring.
3-Fix the driving power supply in a concealed, dry and well-ventilated position (such as inside the ceiling, behind the cabinet) with screws; keep it away from high-temperature heat sources and flammable materials, and reserve a certain maintenance space around the power supply.
4-Wrap the wiring connection ports with high-insulation electrical tape for multiple layers to ensure tight sealing and prevent electric leakage and short circuit, a key step for waterproof LED strip installation.
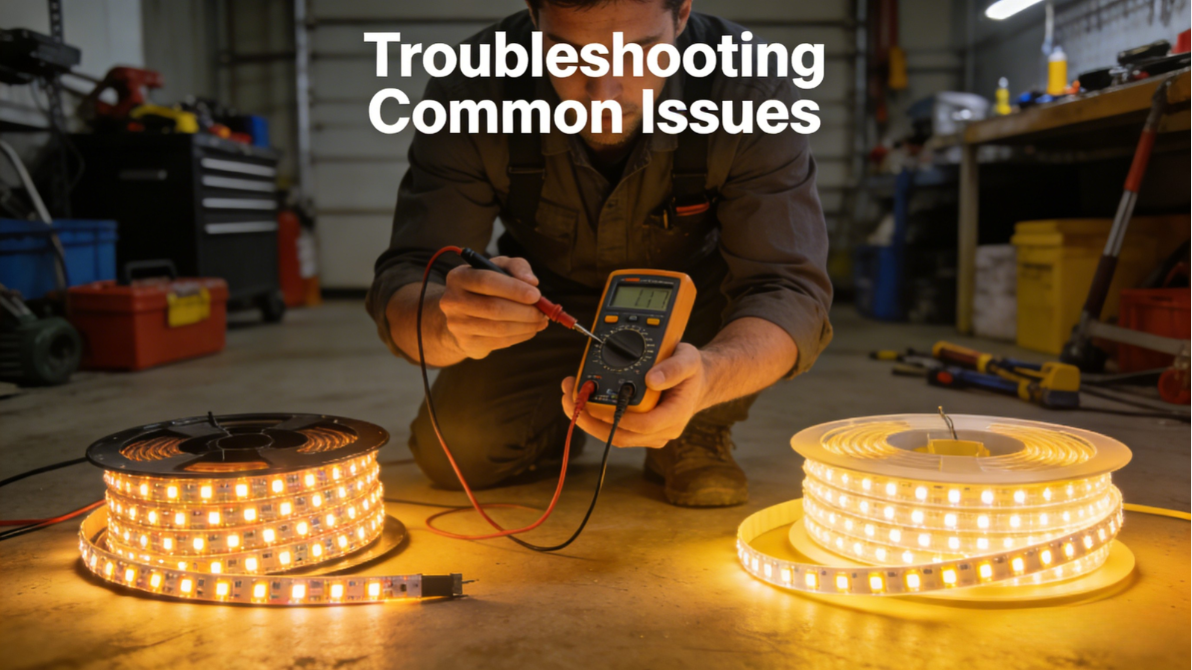
3.4 Comprehensive Power-On Test and Fault Troubleshooting
Conduct a step-by-step power-on test after the installation is completed to identify and eliminate potential faults in a timely manner, a critical part of old LED light strip renovation:
1-Turn on the main power supply and check whether the light strip lights up normally, with uniform brightness and no flicker, stroboflash or local dark spots.
2-If the light strip fails to light up: Check the polarity connection first, then verify the wiring contact and the functional status of the driving power supply, and troubleshoot and adjust one by one—one of the most common LED light strip common faults solution.
3-If the light strip flickers or the brightness is unstable: Inspect the matching degree of the driving power supply, the tightness of the wiring connection and the voltage attenuation of the long light strip, and take targeted measures such as replacing the power supply, reinforcing the connection or adding a signal amplifier, a key LED light strip common faults solution.
4-Conduct a 15-30 minute continuous power-on test for the qualified light strip, and check the surface temperature of the wiring and driving power supply to ensure no abnormal overheating.
3.5 Final Finishing and Site Clearing
Complete the post-installation finishing work to optimize the overall installation effect and ensure the tidiness of the construction site for old LED light strip renovation:
1-Organize all the wiring, and hide the exposed wiring in the ceiling, wiring slot or decorative line to ensure the aesthetic of the spatial layout for LED strip wiring installation.
2-Reinforce the key connection nodes and fixing parts again to eliminate potential safety hazards caused by loose installation, especially for waterproof LED strip installation.
3-Clean up the construction waste and tools at the installation site, and conduct a comprehensive inspection of the light strip installation effect and functional status.
4. Common Faults and Professional Solutions for Old Light Strip Renovation
4.1 New Light Strip Fails to Light Up After Connection
Root causes: Reverse connection of positive and negative poles (most common), inconsistent wiring voltage and light strip rated voltage, damaged driving power supply, poor wiring contact—core LED light strip common faults solution scenarios.
Solutions:
1-Check and correct the positive and negative polarity connection of the wiring in accordance with the marks, a basic step for 12V 24V LED strip wiring.
2-Re-test the wiring voltage with a multimeter and replace the light strip matching the voltage parameter for original wiring matching.
3-Replace the driving power supply with a new one of the same model for functional testing.
4-Reconnect the loose wiring connection ports and reinforce the sealing with electrical tape, a key step in LED strip wiring installation.
4.2 Light Flicker and Unstable Brightness After Power-On
Root causes: Mismatched driving power supply (insufficient power, poor quality), poor wiring contact, voltage attenuation of overlong light strip, unstable mains voltage—another key LED light strip common faults solution scenario.
Solutions:
1-Replace with a brand-certified driving power supply that is fully matched with the light strip’s rated voltage and total power, critical for 12V 24V LED strip wiring.
2-Reinforce all wiring connection nodes to ensure tight and reliable contact for original wiring matching.
3-Adopt shunt installation for overlong light strips or add a professional LED voltage amplifier to compensate for voltage attenuation in LED strip wiring installation.
Install a voltage stabilizer at the mains input end for scenarios with unstable mains voltage.
4.3 Abnormal Overheating of Wiring and Power Supply with Burnt Smell
Root causes: Wiring overload, poor contact at connection ports leading to local short circuit, poor heat dissipation of driving power supply, low-quality wiring with substandard cross-sectional area—an urgent LED light strip common faults solution scenario.
Solutions:
1-Replace the wiring with a larger cross-sectional area or reduce the length of the light strip to reduce the load for LED strip wiring installation.
2-Cut off the power supply immediately, reprocess the short-circuited connection ports, and replace the damaged wiring sections for original wiring matching.
3-Adjust the installation position of the driving power supply to ensure sufficient heat dissipation space, and clean the dust on the heat dissipation surface of the power supply.
4-Replace all low-quality and non-compliant wiring with national standard electrical wiring, essential for 12V 24V LED strip wiring.
The core of old LED light strip renovation lies in standardized disassembly, scientific wiring matching and formal installation construction. By following the professional operation procedures and technical norms elaborated in this guide, conducting full pre-construction preparation, accurately detecting and confirming wiring parameters, and strictly abiding by electrical safety operation requirements, both professional and non-professional operators can complete the old light strip renovation work efficiently and safely.
Replacing and upgrading old light strips with high-quality LED light strips not only fundamentally solves the problems of luminance attenuation, high power consumption and frequent failures of traditional light strips, but also effectively improves the lighting quality and aesthetic effect of the space, and realizes the energy-saving and environmental protection of the lighting system. For any technical problems encountered in the renovation process such as original wiring matching, LED strip selection and fault troubleshooting, you can consult our professional technical team at any time. We will provide customized one-stop renovation solutions and technical support according to your actual usage scenarios and needs, helping you complete the light strip upgrade efficiently and realize the long-term stable operation of the lighting system with energy saving, high brightness and durability—covering all demands of 12V 24V LED strip wiring, waterproof LED strip installation and LED light strip common faults solution.
Facebook:https://www.facebook.com/profile.php?id=100089993887545
Instagram:https://www.instagram.com/mx.lighting.factory/
YouTube:https://www.youtube.com/channel/UCMGxjM8gU0IOchPdYJ9Qt_w/featured
LinkedIn:https://www.linkedin.com/company/mingxue/
Post time: Mar-03-2026